

Are You Scared to Remove Your Acrylic Nails?
Honestly, Acrylic nail removal feels a little intimidating, especially if you are worried about damaging your natural nails.
These doubts are very common, particularly for beginners.
But here is a truth,
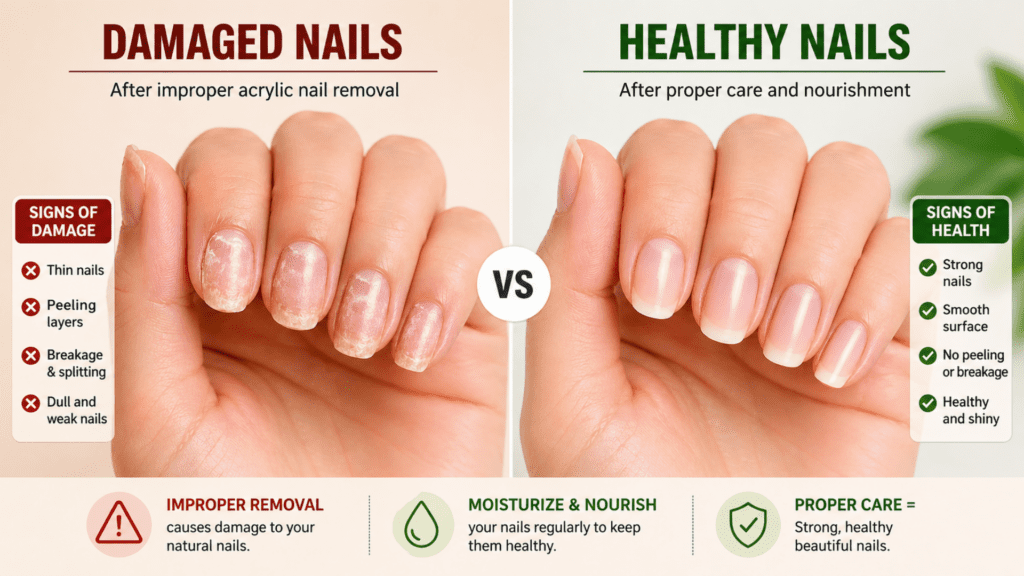
There is no problem with Acrylic nails, but incorrect removal is the main cause of damage.
Actually, when using the wrong method, the nails will thin, peel, and start to weaken.
But if you follow the proper method, you can safely remove acrylic nails at home without causing any damage.
If you’re worried about chemicals or long-term nail damage, it’s definitely worth checking out whether acrylic nails are really non-toxic and what safer options you can go for.
What are Acrylic Nails Na Enna?
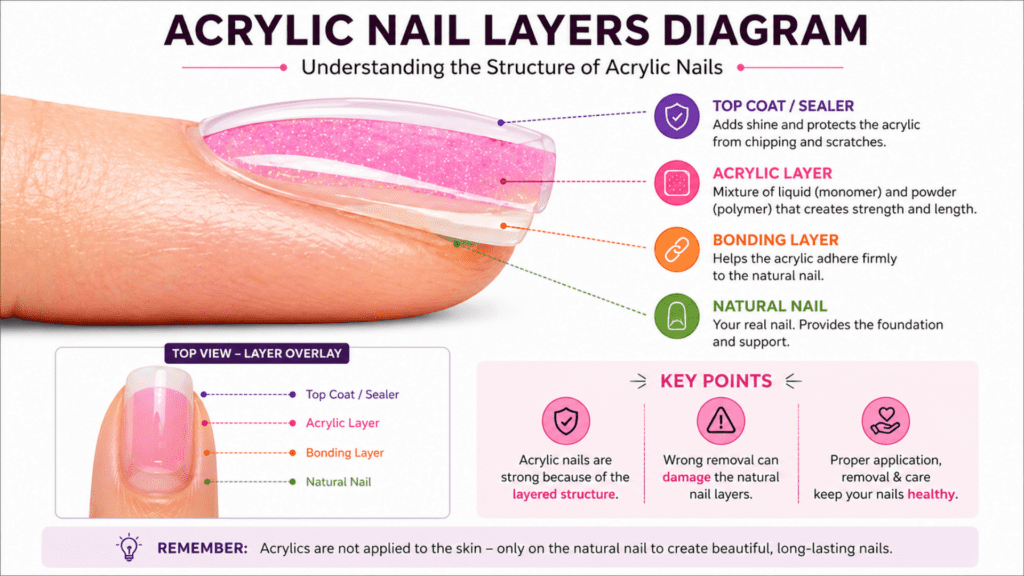
Acrylic nails are applied by mixing a paste of liquid and powder on your natural nail, creating a strong protective layer.
This layer creates a very strong bond, so the nails will look long and maintain their shape, but it’s also the reason to be careful when removing.
If you didn’t care for it properly, the acrylic layer will also damage the keratin in the natural nail.
What problem will be caused by the wrong removal?
While removing the acrylic nails, the biggest mistake people make is impatience.
When you,
- Peel
- Pull
- Force removal
If you use these methods, not only will your acrylic layers peel, but your natural nail layers will too.
How will this damage?
On your natural nail, there won’t be a single layer, but multiple layers will be present
When you are forced to remove,
- These layers will get peeled.
- Weak Nail structure
So the Result will be,
- Thin Nails
- Peel the Surface
- Easily gets a break
- Nails Feel Sensitive
Because of these results, many people say acrylic nails damage their natural nails.
Here is a small reminder: if your nails already feel weak, check out “Why do my nails break easily?” In this guide, we have explained the reasons in detail.
Make your Tools Ready (Preparation = No Damage)
When removing acrylic nails, use the correct tool to avoid damage.
If your setup is correct, this process will be very smooth; otherwise, in the last step, you will rush and force, and then the damage will happen.
Before you start, make sure you have these tools ready.
Essential Tools
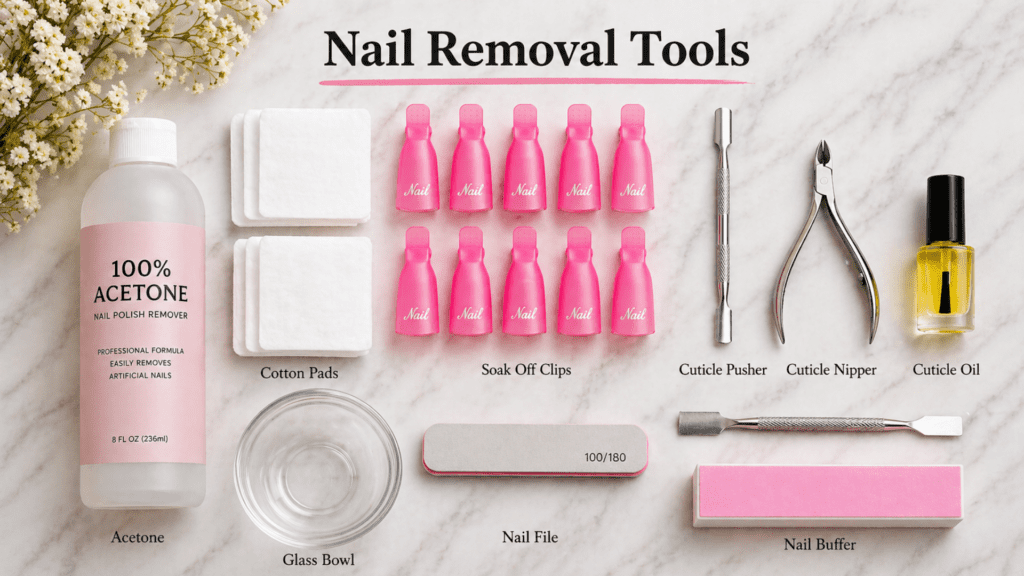
1. 100% Pure Acetone
Aceton is the main ingredient for removing acrylic nails.
- Acrylic layers will dissolve in acetone.
- Regular nail polish remover will not work.
And the Important thing is:
If you use Pure acetone, It dissolves quickly and doesn’t need to be forced; otherwise, the soaking time will be longer, leaving you frustrated.
2. Nail File (100/180 Grit)
Using a nail file removes the top shiny layer.
Why is this step important?
After removing the top coat, acetone penetrates the surface.
Be very Careful:
- File only on the Acrylic.
- It should not come into contact with the Natural nail.
3. Buffer (220+ Grit)
This will be used to give a smooth finish on the final stage, to remove,
- Remaining residues
- Gives a neat look to the Nail surface
Use it gently; if you do overbuff, the nail will get thin.
4. Cotton Pads / Balls
To soak in acetone, cotton pads will be used.
Tip:
- Soak the Cotton fully.
- If you keep it semi-dry, it won’t work properly.
5. Aluminium Foil / Nail Clips
Aluminium foil is to hold the cotton on the nail, so the
- Acetone will not evaporate.
- The soak process will be fast.
If you want an alternative, you can use Nail soak-off clips, which will be easy too.
6. Cuticle Pusher
The cutilcle pusher is to remove the soft acrylics.
The Golden rule is,
Only push when it comes easily, or the natural nail will get damaged.
7. Cuticle Oil
After removing, cuticle oil is a must to hydrate the nails.
- It reduces the Dryness.
- Speed up the Nail recovery process.
If you use Acetone, the nails will get very dry, so the oil is mandatory.
8. Petroleum Jelly
Petrolatum jelly is used to protect the skin.
Why is it important?
- Acetone will dry the nails.
- Avoid Skin irritation
Before soaking, it will be applied to the cuticle area.
If you make these tools ready,
✔ The Removal will be very smooth
✔ Saves Time
✔ Avoid Damages
Quick Tool Checklist
QUICK TOOL CHECKLIST
| Tool | Recommended Product |
|---|---|
| Acetone | Supernail Pure Acetone Nail Polish Remover |
| Nail File (100/180 grit) | Basic Professional Nail File |
| Buffer | Nail Buffer Block |
| Cotton Pads | Lint-Free Cotton Pads |
| Foil / Clips | Makartt Nail Polish Remover Clips Kit |
| Cuticle Pusher | Wooden or Metal Cuticle Pusher |
| Cuticle Oil | Cuccio Naturale Milk & Honey Revitalizing Cuticle Oil |
| Nail Cutter | Stainless Steel Nail Clipper |
| Skin Protection | Vaseline Petroleum Jelly |
Beginner Shortcut: All-in-One Kit
If you don’t want to buy all the tools separately, you can use a simple complete removal kit.
SAVILAND Acrylic Nail Remover Kit
Pros:
- Remover and basic tools are included.
- Beginner-friendly, easy to use
- Saves time
Cons
- Take time to remove thick acrylic nails.
- Acetone will not dissolve acrylic deeply soak method madhiri deep ah dissolve panna maataadhu
- Overusing may cause dryness.
If you’re removing acrylic nails for the first time, it’s the best option, but the safest method is still the acetone soak.
It’s a Quick option, but to safely remove, you need patience, and the proper method is important.
Step-by-Step Safe Acrylic Nail Removal Method
While removing acrylics, don’t rush; patience is very important.
If you follow the correct steps, you can avoid the damage.
Step 1: Make Nails Short
First, make the nails short.
It helps to,
✔ Soak fast
✔ Esiy to Remove
When your nails are long, it is difficult for acetone to reach the tips, and time will be wasted.
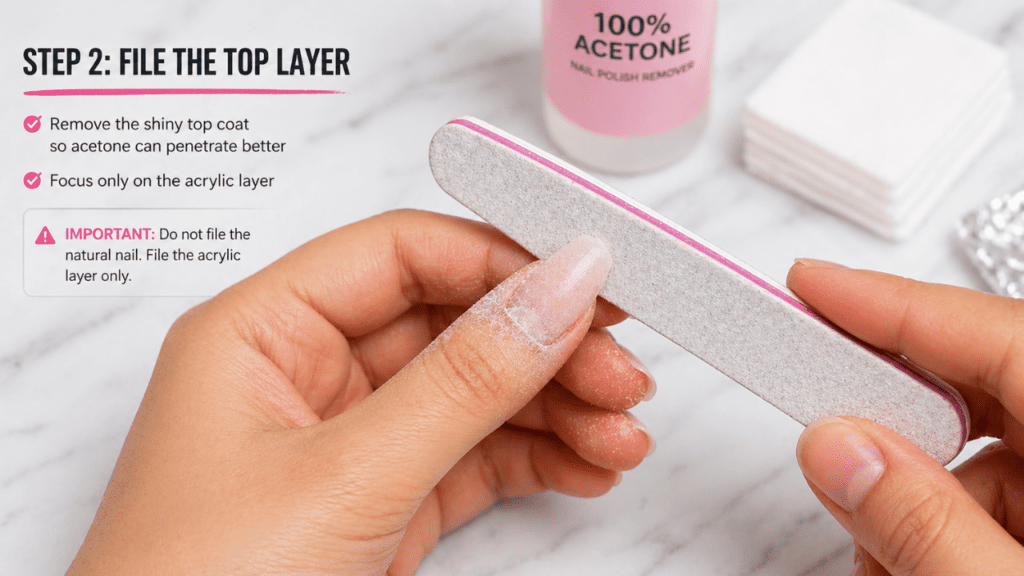
Step 2: File the Top Layer
This is the most important step.
Remove the top shiny coat on the acrylic nails using a file.
This will help the acetone to penetrate the nails.
- Don’t file on the Natural nail.
- Focus only on the acrylic layer.
Step 3: Protect the Skin
Acetone will make the skin very dry, so before soaking.
Apply petroleum jelly to the Cuticle area.
This will avoid skin dryness and irritation.
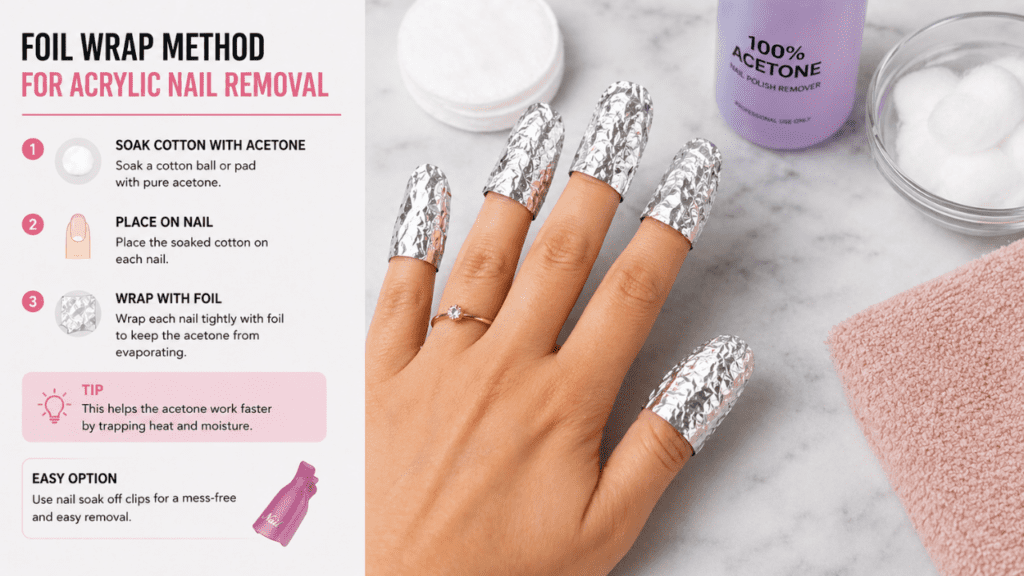
Step 4: Foil Wrap Method
Now the main soaking process starts,
- Soak the cotton in acetone.
- Keep that on the above nail.
- Use a foil and tightly wrap it.
This will trap heat and speed up the reaction of the acetone.
Step 5: Patience Time
Now wait, this is the most important stage.
Wait for at least 15–20 minutes.
If you try to rush it,
- Acrylic will not soften.
- Then you need to force remove
The Ready signs are,
✔ Acrylic gets soft
✔ Flaky / lift
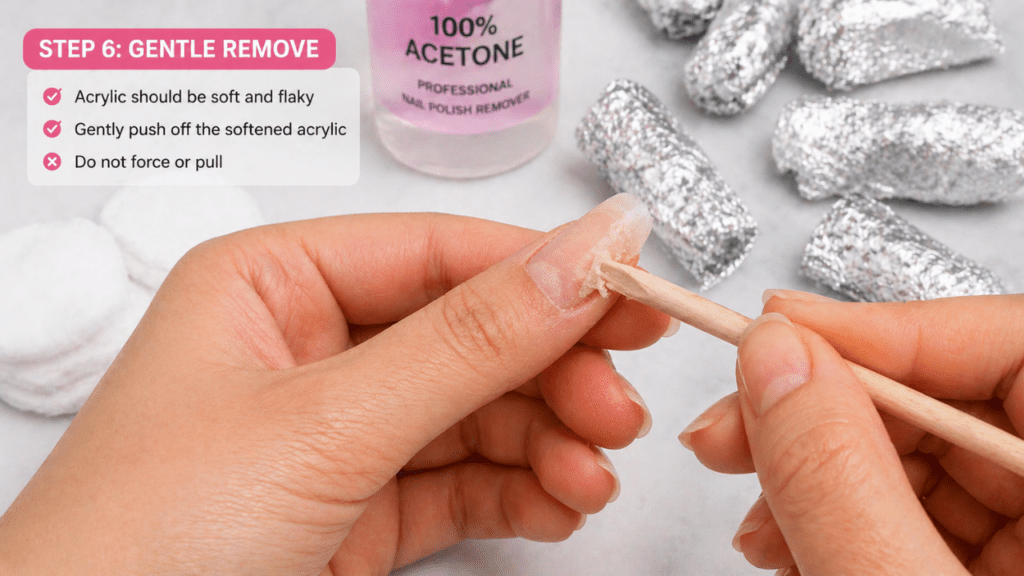
Step 6: Gentle Remove
Now, gently remove the acrylics.
- It will come easily
- If you push slightly, it will remove
If no:
Re-soak again for 10 mins
I am repeating again, don’t force it; your natural nails will get damaged.
Step 7: Buff & Shape
To remove remaining residue, use buffer, remove panna buffer.
- Surface will be smooth.
- Nails will look neat.
Avoid Over Buffering
Troubleshooting Common Soak-Off Issues
Sometimes, acrylic nails may not come off smoothly, even if you follow the steps.
Don’t worry, most issues are common and easy to fix.
Common Problems & Solutions
| Problem | Reason | Solution |
|---|---|---|
| Acrylic not coming off | Top coat not removed properly | Re-file the top layer and soak again |
| Nails feel hard | Thick acrylic layer | Use a warm soak and wait longer |
| Sticky or gummy texture | Acrylic partially dissolved | Re-soak for 10–15 minutes |
| Nails feel very dry | Acetone exposure | Apply cuticle oil and moisturizer |
| Burning sensation | Sensitive skin or overexposure | Wash immediately and stop the process |
Aftercare
After removal, the nails will become very dry, so hydration is essential.
Apply cuticle oil and moisturiser on the hands; this will keep
- Nails hydrated
- Recovery will be fast.
- Reduces Breakage
By following these steps correctly, you can avoid the damage.
Safer Options: Are non-toxic acrylic nails available?
To be Honestly..
There is 100% non-toxic acrylic, but… we have safer options available in the markets,
If you want low-chemical options, check this guide. We have explained in detail about
Are Acrylic Nails Non-Toxic? Safer Alternatives for Healthy Nails
Nail Recovery Plan – After Removal
After removing the acrylic nails, your nails may feel dry and sore. This is completely normal, but if you take proper care, you can make your nail recover faster.
So, follow this simple routine.
Daily Routine
Should consistently follow the Daily care
- Apply Cuticle oil daily.
- Use Moisturizer
This will reduce dryness, soften nails, and help prevent breaking.
Weekly Care
For Weekly 1–2 times
- Use Nail strengthener
This will help the nails to be stronger.
Long-Term Care
The most important rule after using acrylic is
Give a break for 2–4 weeks before the next acrylic set.
If used continuously, your nails may become weak.
Daily habits also matter:
Protect nails while washing dishes
Bonus: Nutrition Matters
Outside care alone will not help; a healthy diet is also important for nail health and overall body health.
Include:
- Protein-rich foods
- Vitamins (Biotin, Iron)
If you want a full, detailed list, check out Foods that help nail growth.

Common Mistakes to Avoid
When removing Acrylic nails, you may make mistakes that can cause significant damage.
So, avoid these mistakes.
Don’t Rush
As I already mentioned, if you try to remove fast,
- Acrylic will not soften.
- Then you need to force-pull, which causes damage.
Don’t Force
It is very dangerous to peel or pull.
If you do this,
- Natural nail layers will affect.
- Nails will get thin & weak.
Skipping Aftercare
Scritly, don’t skip the after-care after removing the acrylics.
- Nails will get dry
- Increase Breakage
Always use Oil and moisturiser. The Biggest Mistake is being impatient; wait and remove gently.
When should you go to the salon?
In some situations, you should not try to remove it yourself; instead, ask a professional to perform a safe removal.
Pain
If you feel sharp pain while removal,
- Stop it immediately
- Don’t try to force it.
This is the sign for damage.
Already Nail damaged
If your nails are already,
- Nails thin
- Peeling or breaking
Home removal is risky.
Infection signs
You should not ignore this,
- Redness
- Swelling
- Pus / unusual smell
- Severe pain
If any of these happen, go to a doctor or a salon immediately.
Don’t take any risk in this situation; nail health is also important. Get help from professionals, and that is the safest option too.
FAQs (Frequently Asked Questions)
How long does it take to remove acrylic nails?
Usually, it takes about 30–60 minutes.
But depends on,
- Acrylic thickness
- Proper filing
- Acetone strength
Don’t try to rush it; patience is very important.
Can I use regular nail polish remover?
Big no, you should not use nail polish remover.
The reasons are,
- The acetone strength in the regular remover will be weak,
- It will not dissolve the Acrylic.
The best option is to use 100% pure acetone.
Will my nails be weak after removal?
Yes, but that is temporary.
You may feel,
- Nails become thin
- Dry
But if you take proper care, your nails will return to normal.
Do acrylic nails damage natural nails?
Not directly, but the real reason is that the wrong removal method will be used.
If you follow the correct method, you can easily avoid damage.
When can I get acrylic nails again?
Ideally, you need to take a break for 2–4 weeks.
This will help the nails to recover.
My Final Thoughts
Acrylic nail removal is not a speed game; it’s a patience game.
Most damage will happen when you rush it,
If you,
✔ Correctly do soaking
✔ Gentle while removing
✔ Follows proper aftercare
Your natural nails will be safe and healthy.
Do it slowly and handle gently; this will make the main difference.
Take your time, your nails will thank you later.
Looking for simple, beginner-friendly nail care advice and proven tips?
Visit thenaturalnail.com.
