
You know what, shaping is what makes the biggest difference in acrylic nails. Even simple acrylic nails will look salon-quality if you create a clean, balanced shape.
Meanwhile, uneven sidewalls, bulky tips, or crooked filing can make a fresh set look very messy, so acrylic nail shaping is important.
But the good thing is, you don’t need a professional nail tech to create a proper acrylic nail shape. With the right tools, a little patience, and proper filing techniques, we can do it at home.
At first, you may feel it’s difficult. But once you understand the filing angles, shaping the nail structure will be very easy.
In this guide, we will see about:
- How to shape acrylic nails step by step,
- Best tools for acrylic nail shaping,
- Popular acrylic nail shapes,
- Common mistakes made by beginners,
- and how to achieve the salon-quality finish.
Also, if you feel your natural nails are weak, you should improve your overall health to help maintain your acrylic nails. This guide will be useful to you: 15 Best Foods for Nail Growth Naturally.
Understanding Acrylic Nail Structure Before Shaping
Before learning how to shape acrylic nails like a pro, we need to understand the basic structure of nails. Honestly, if you know this, the shaping will be less confusing.
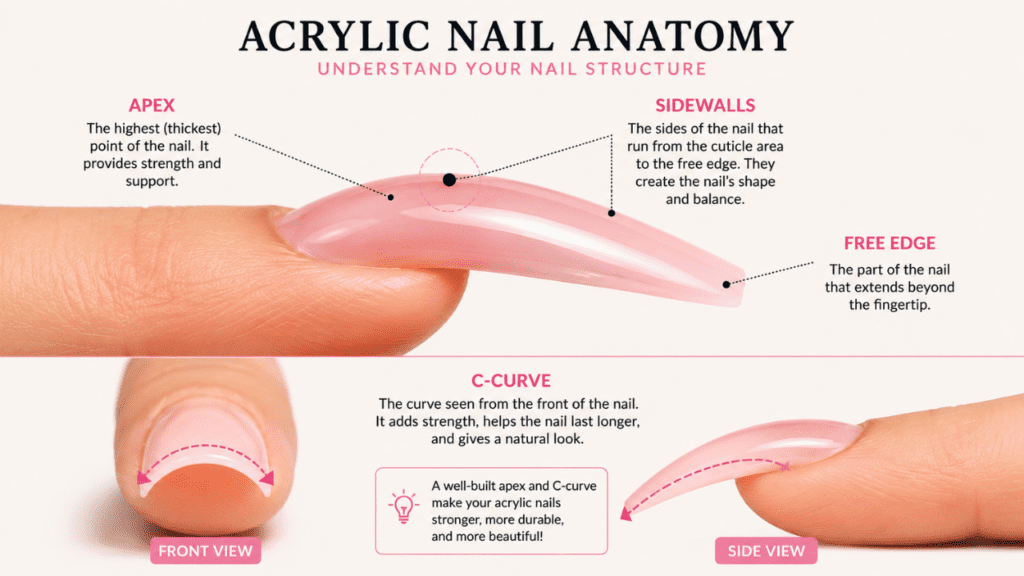
Apex
Apex is the nail’s support system and the thickest part of an acrylic nail.
Most importantly, the nails get strength and support from this area. If you don’t have proper apex, especially a long coffin or stiletto nail, it will crack or break easily.
Sidewalls
Sidewalls are the straight edges coming from the cuticle area to the tip.
If the sidewalls are uneven, a full acrylic nail shape will look crooked. Actually, many nail techs will shape the sidewalls first, which gives full balance to the base.
Free Edge
The free edge is the part of the fingertip that extends.
Mostly, the Square, coffin, almond, oval, and stiletto shapes will be done here.
C-Curve
If we look at the nails from the front, we can see the curve.
This curve is the C-curve, which adds strength and gives the acrylic nails a natural, clean look.
Best Tools to Shape Acrylic Nails
You will find it easier to achieve acrylic nail shaping with the right tools.
Thankfully, you don’t need an expensive salon setup. A few basic tools are enough to achieve clean, professional-looking acrylic nails.
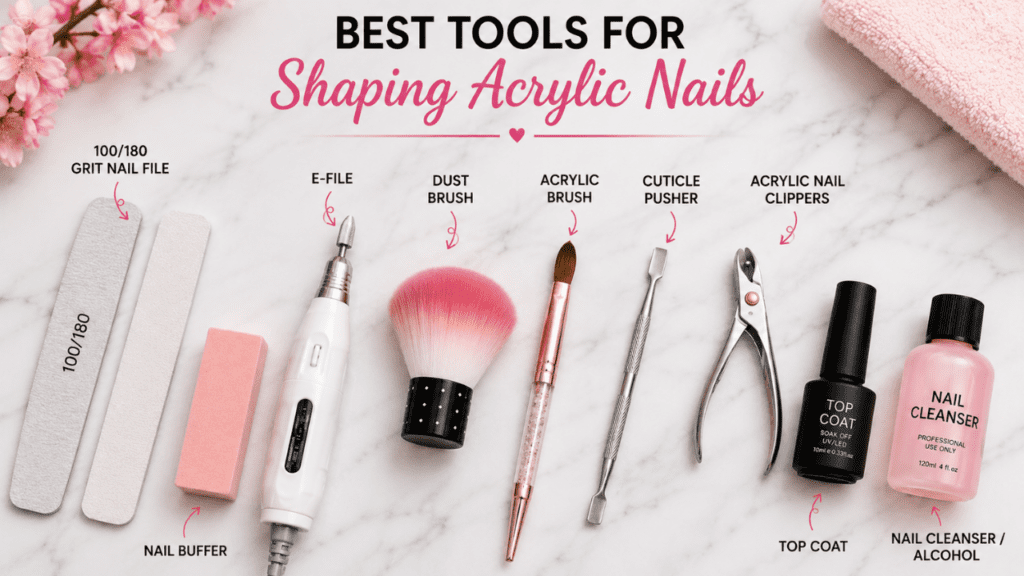
100/180 Grit Nail File
A high-quality 100/180-grit nail file is the most important tool for shaping acrylic nails. Usually, the rougher side feels bulkier; this helps remove it, while we can gradually smooth and refine the finer side.
Hand files are easier and safer, especially for beginners learning to shape acrylic nails, because they give you more control.
Electric Nail File (E-File)
Nowadays, most nail techs use electric nail files (e-files), which help speed up the shaping and refining process.
Still, for beginners, it’s important to use the light-pressure option because e-files will remove the product quickly, and if you over-file, heat builds up easily, especially near the natural nail.
If you regularly do acrylic nails at home, a beginner-friendly e-file can save you time and make acrylic nail shaping easier.
Nail Buffer
To shape the acrylic nails, use a soft nail buffer block to smooth the uneven texture.
Actually, these small steps create a huge difference because when the nails are buffed, they will look clean before applying the top coat.
Acrylic Nail Clippers
Before doing detailed shaping, acrylic nail clippers are used first to reduce the length.
This will help make the filing easier, especially for longer acrylic nail shapes like coffin and stiletto nails.
Dust Brush
The soft nail dust brush helps remove acrylic dust during filing.
Besides, by keeping the workspace cleaner and removing the dust, you can clearly see the shape of the nails and avoid uneven filing.
Cuticle Pusher
Before applying or shaping acrylic nails, use a cuticle pusher to gently push back the cuticles; this will create a cleaner nail base.
Messy cuticles can make the acrylic nails near the nail bed look uneven.
Nail Cleanser or Alcohol
Using a Nail cleanser or isopropyl alcohol helps remove oils, dust, and residue.
Clean nails usually adhere better to acrylic products and produce a smoother finish.
Top Coat
A good-quality top coat not only protects the acrylic shapes but also adds extra shine.
Additionally, top-coat acrylic nails will be cleaner, smoother, and instantly more salon-like.
In addition to proper filing, using the right brushes for acrylic application provides control and improves shaping. If you are confused about the brush sizes, I have written a detailed article. Check the Acrylic Nail Brushes Guide.
| Tool | Purpose | Recommended Product |
|---|---|---|
| 100/180 Grit Nail File | Main shaping and refining | View Product |
| Electric Nail File (E-File) | Faster shaping and bulk removal | View Product |
| Soft Nail Buffer Block | Smooth scratches and uneven texture | View Product |
| Acrylic Nail Clippers | Reduce nail length before shaping | View Product |
| Dust Brush | Remove acrylic dust while filing | View Product |
| Cuticle Pusher | Push back cuticles for cleaner prep | View Product |
| Nail Cleanser / Alcohol | Remove oils, dust, and residue | View Product |
| Top Coat | Add shine and protect nail shape | View Product |
| Acrylic Nail Brush | Better acrylic application and control | View Product |
Do Beginners Need an Electric Nail File (E-File)?
Using E-files, you can quickly shape and refine acrylic nails. So, most professional nail techs prefer using this.
But it is not necessary for beginners to use it, because e-files work effectively; if you apply a bit more pressure, the acrylics will remove quickly. Sometimes, you may feel the heat if the file stays in one area too long.
At first, if you use regular hand files, you will easily understand nail angles and get nail control. Once you feel comfortable, then slowly start using e-file.
Nail Prep Before Shaping Acrylic Nails
Many people focus only on filing, but proper prep before doing acrylics makes a huge difference.
If the acrylic application is uneven or messy, it is tough to do shaping.
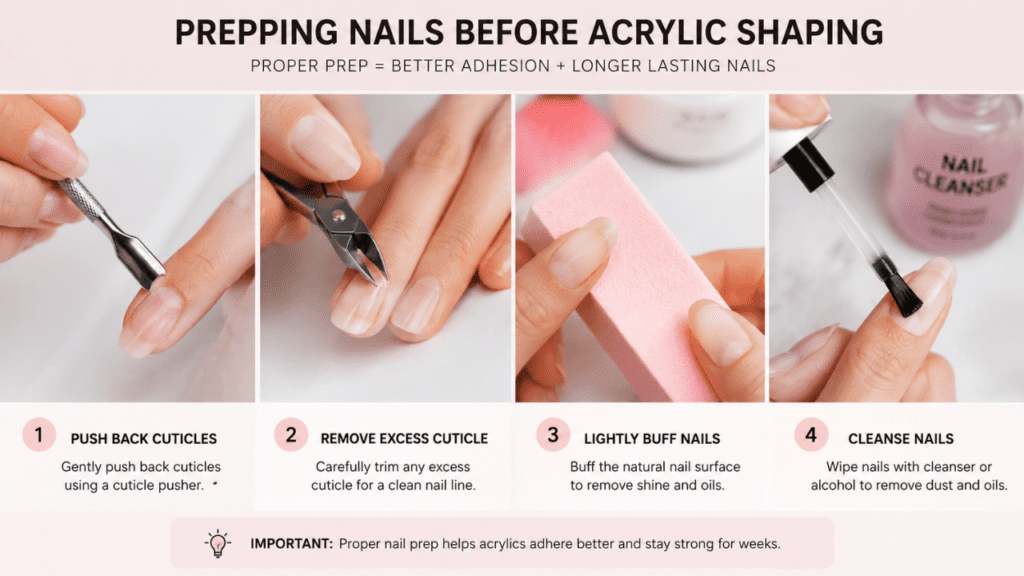
Simple Nail Prep Routine
Before shaping acrylic nails:
- Wash your hands and sanitise
- Gently push back the Cuticles.
- Buff the Natural nail lightly.
- Remove the Dust properly.
- If necessary, reduce the nail length.
If you follow this, you will feel the filing is smoother and easier.
How to Shape Acrylic Nails Properly
A common beginner mistake is directly starting to shape the nail tip,
Actually, professional nail techs usually focus on sidewalls.
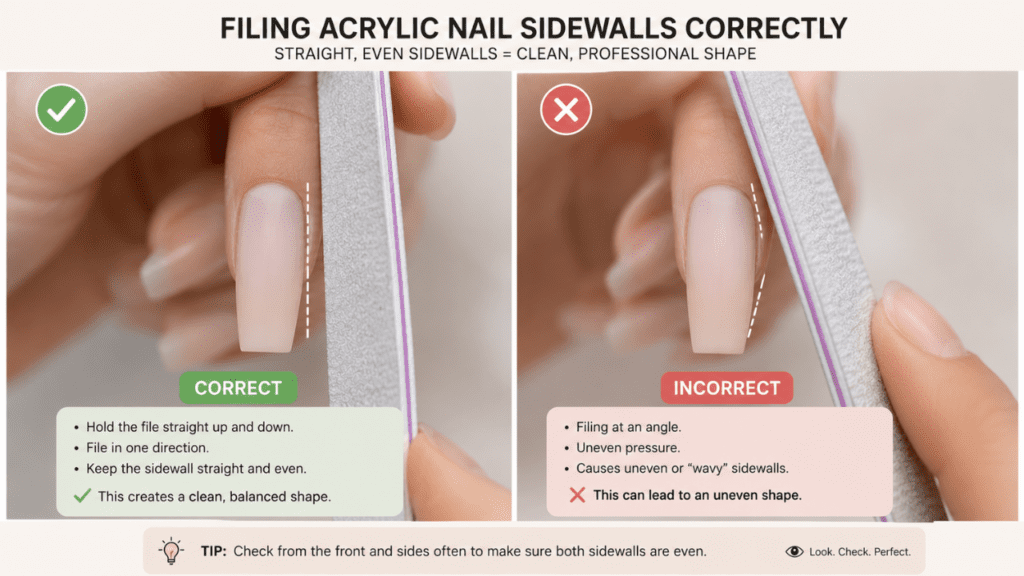
Step 1: File Sidewalls First
First, check whether both sides are straight and balanced.
This step will create symmetry in the full nail.
Also, if you check the nail from different angles, you can notice uneven filing early on.
Step 2: Shape the Free Edge
If you confirm the sidewalls are even, start to shape the nail tip.
At this stage, slow filing yields cleaner results than aggressive filing. Likewise, if you file in one direction, you will get smoother edges. l
Step 3: Refine the Nail Surface
Next, start to smooth the bulky areas or uneven spots.
In this stage, the acrylic nails should look clean and polished.
If you are a beginner and want to know the difference between acrylic and gel nails, check out our guide, Acrylic vs Gel Nails. I have clearly written about the differences, pros and cons, and which is better for you.
Popular Acrylic Nail Shapes
Different acrylic nail shapes will create different styles. In fact, choosing the right nail shape will change the overall look of the manicure. Some shapes give a clean, classic look, while others give a bold, trendy look.
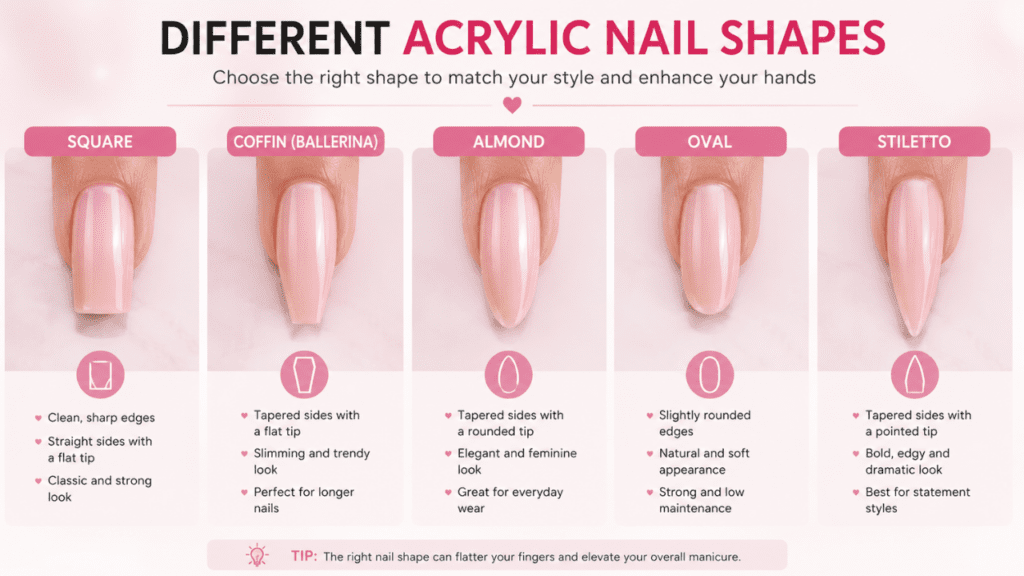
How to Shape Square Acrylic Nails
Square nails are among the easiest acrylic nail shapes and are very beginner-friendly. For a clean, structured, and professional look, this shape is a super option.
In this shape, straight sidewalls, a flat tip, and sharper corners will be present.
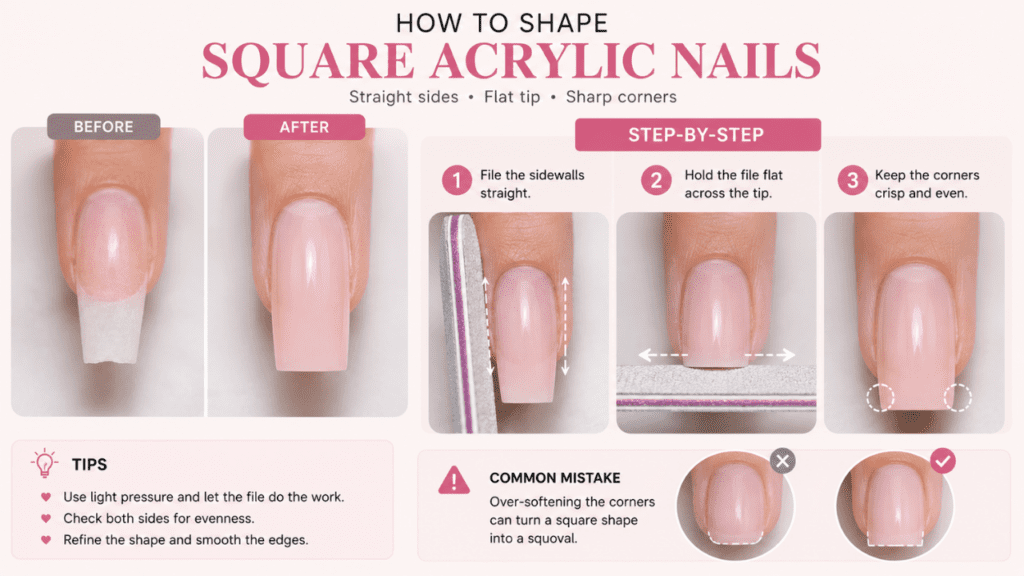
Steps to Shape Square Acrylic Nails
- First, file the sidewalls straight.
- Then hold the files flatly on the tip.
- Maintain the corners crisp.
- Check whether both sides are equal.
Square acrylic nails often give a clean, polished look, especially for nude and French tip styles.
Common Mistake
Many beginners will over-soften the corners. So the square nails may look squoval.
How to Shape Coffin Acrylic Nails
The coffin nail is currently very popular because this shape makes the fingers look slimmer and longer.
Usually, this shape is perfect for longer acrylic nails.

Steps to Shape Coffin Acrylic Nails
- Start with longer acrylic nails.
- Gradually taper the Sidewalls inward.
- Check that both sides are symmetrical.
- Finally, file the tip flat.
Coffin nails give a super-stylish look, but if you over-file, the nail structure can weaken, so it’s better to shape slowly.
How to Shape Almond Acrylic Nails
The almond nails will give a soft, elegant, and feminine look. Personally, it will look pretty every day; the hands will naturally look slimmer.
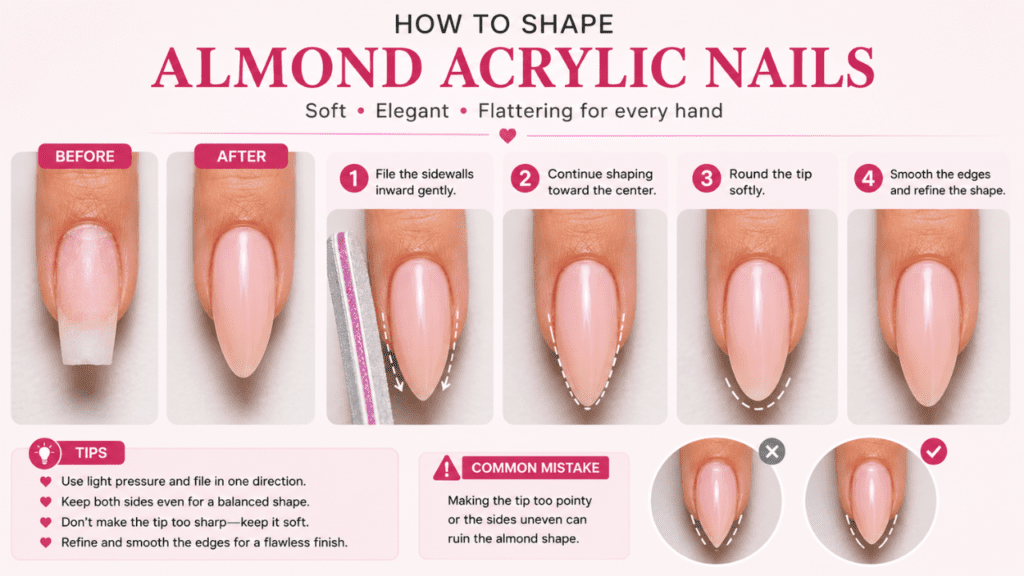
Steps to Shape Almond Acrylic Nails
- File the sidewalls gently towards the centre.
- Round the tip gently.
- Avoid creating a sharp point.
- Check that the shape is smooth and balanced.
Because of their softer shape, almond-shaped nails will look longer and slimmer.
Common Acrylic Nail Shaping Mistakes
Even experienced nail lovers sometimes struggle with acrylic nail shaping. Honestly, small filing mistakes make the full look uneven.
The good thing is that you can gradually improve the proper filing techniques through mistakes and practice.
Uneven Acrylic Nails
Sometimes one side of the acrylic nail appears thicker and longer; this usually happens when the filing angle is uneven.
Fix
Check the acrylics from the front, side, and top views.
When you see it from different angles, you can easily notice the symmetry. If you refine it gradually, you can get a cleaner shape.
Bulky Acrylic Nails
If you apply too much acrylic, the nails will look thicker and heavier. As a result, the nail shape feels bulky and unclean.
Fix
Don’t aggressively remove everything; it’s better to refine gradually. Smaller filing movements usually yield smoother, more balanced results.
Over-Filing the Nail
Over-filing is one of the most common mistakes among beginners.
Unfortunately, excessive filing can weaken both acrylic nails and natural nails.
Fix
Apply gentle pressure while filing; if you use too much force, the nails will get thinner.
Actually, due to excessive filing and improper acrylic removal, your nails may become thin and sensitive. If your nails already feel this way, this guide will be helpful. Why Are My Nails Breaking Easily?
Similarly, repeated acrylic applications can slow the growth of natural nails. If you want to know more about that in detail, check out How to Speed Up Nail Growth Naturally.
Acrylic Nail Safety Tips
Healthy nails should always be the first priority. So it’s important to follow proper, safe filing techniques, especially if you regularly do acrylic nails at home.
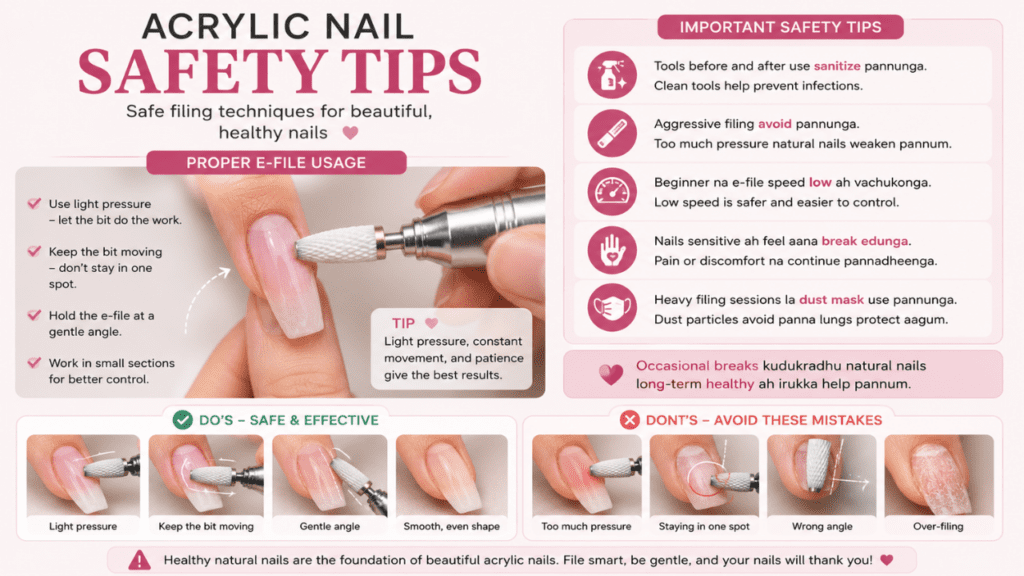
Important Safety Tips
- Before using the tool, sanitise it properly.
- Avoid Aggressive filing.
- If you are a beginner, keep e-file speed low.
- If you feel your nails are sensitive or painful, take a break.
- Use a dust mask during heavy filing sessions.
Additionally, give the natural nails occasional breaks. This will help to maintain long-term nail health.
If you prefer gentler nail products, you can explore safer alternatives to traditional acrylic here: Are Acrylic Nails Non-Toxic? Safer Alternatives for Healthy Nails.
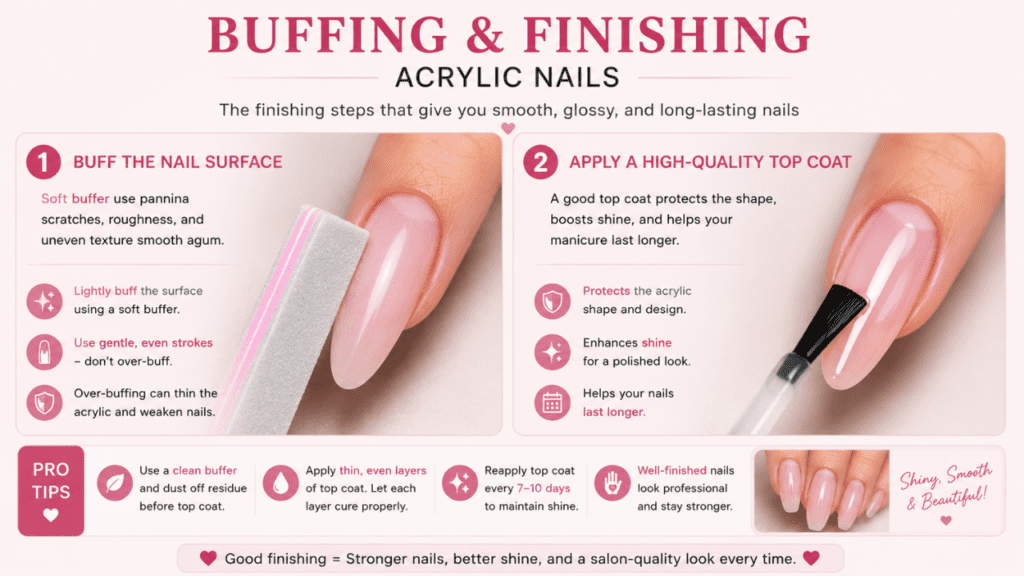
Final Finishing Tips for Acrylic Nails
After shaping acrylic nails, lightly buff and apply a good top coat. This creates a huge difference.
When you buff the tiny scratches and uneven texture, it will get smooth. Similarly, if you use a high-quality top coat, your nails will be cleaner, shinier, and look more salon-quality.
Final Thoughts
Learning how to shape acrylic nails like a pro takes time and needs practice. But once you understand the proper filing angles, sidewalls, and apex placement, the process will become much easier.
At the start, practice simple shapes, such as squares and ovals. Later, when you improve confidence, move with coffin and stiletto shapes.
Most importantly, you should not rush the process.
Slow, careful filing usually creates cleaner, smoother, and more professional-looking acrylic nails.
Of course, proper removal is also important as proper shaping. If you force-peel acrylic nails, your natural nails will be damaged. For safe removal tips, check our guide, The Expert Guide to Safely Removing Acrylic Nails at Home.
With regular practice, your acrylic nail-shaping skills will improve gradually, and eventually, your DIY nails will start to look beautiful, like salon nails.
