
When I first got interested in acrylic nails, I thought it would require a huge professional setup.
While scrolling through Instagram, I noticed that almost every video featured a full setup: a giant table, machines, drills, powders, lights, and containers.
And… when I saw that, it looked more complicated than the acrylic nails themselves.
For a few days, I didn’t even start practising; I was just watching all the videos and saving them, and I felt I didn’t have enough tools.
But slowly I started to understand one thing. To start acrylic nails, we just need a few basic things.
Not a salon room.
Not 25 different brushes.
Not expensive machines.
Just a simple setup, a little patience, and practice.
And honestly? When I started to understand that, I didn’t feel scared to start acrylic nails.
If you are feeling confused about acrylic nail tools, don’t worry. Most beginners will feel the same way, and that was exactly how I felt too.
So, I am not going to overload this article with unnecessary professional tools; we will focus on simple tools that beginners actually want and will find most useful.
First… What are Acrylic Nails?
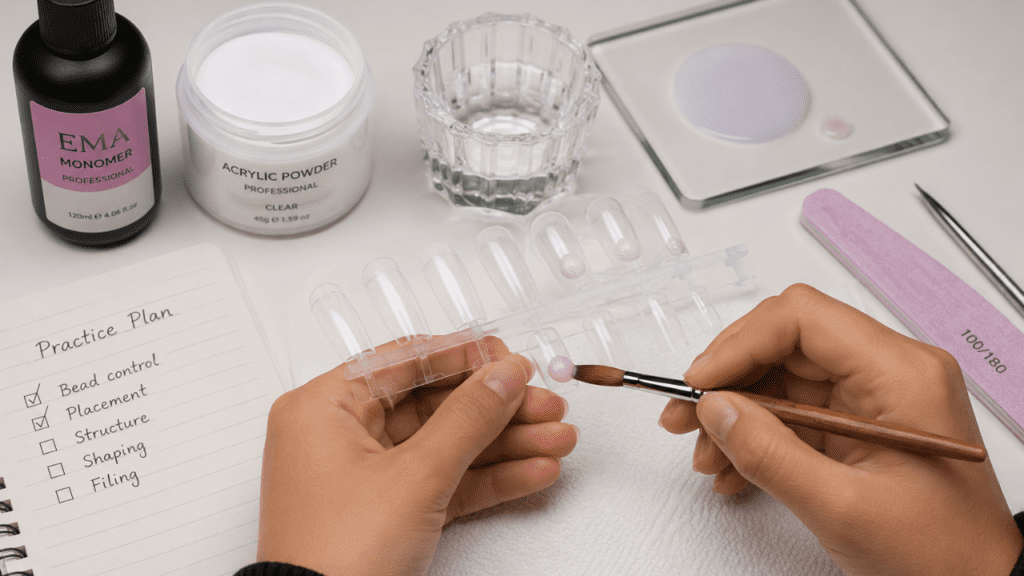
To tell you, simple acrylic nails are made by mixing acrylic powder and liquid monomer.
When we combine these two, we can create a small, soft bead that will be shaped on the nail and harden in a few minutes.
That’s the whole idea behind acrylic nails.
When I first tried to understand this, the terms “polymer”, “monomer”, and “bead consistency” sounded very technical.
But once I started to understand the basics, everything felt easier.
And trust me… you can easily understand how to do acrylic nails by watching videos online, but in real life you need practice.
Come, let’s start…
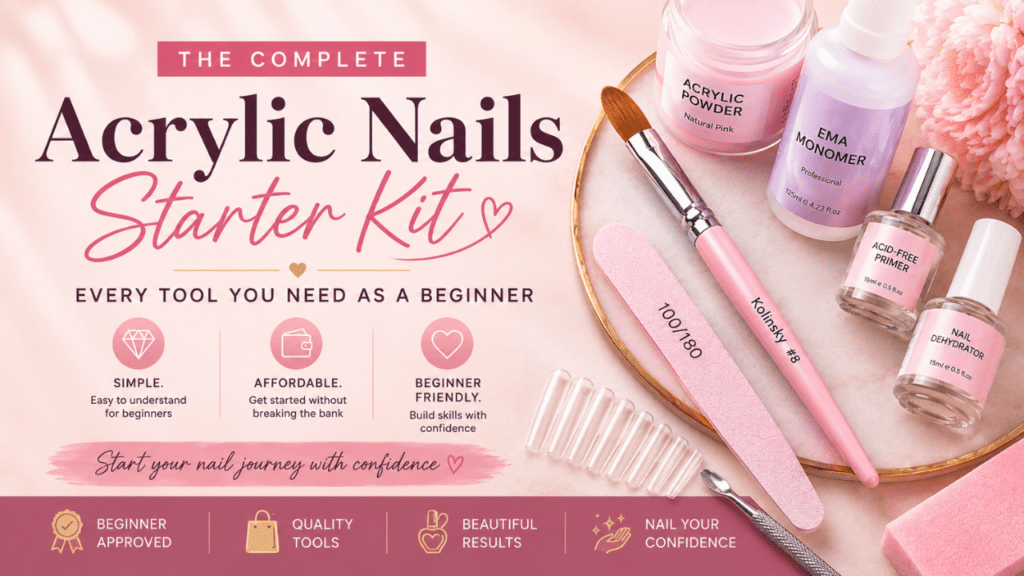
1. Acrylic Powder & EMA Monomer
These are the two products you truly cannot skip.
Powder gives the nail structure; the monomer makes the powder workable acrylic.
And honestly, beginners, when you are starting, you don’t need:
- 15 colour powders
- Glitter collections
- Fancy acrylic sets
A simple setup is enough; try to choose:
- Clear powder
- Natural pink powder
- White powder (optional)
One thing nobody clearly explains to beginners is:
Please buy EMA monomer; don’t go with MMA.
In cheap beginner kits, MMA will be used sometimes, but
- The smell will be very strong.
- It will be harsh for nails.
- Difficult to remove
When I was researching for the first time, it was very confusing, and nobody online mentioned this simple thing either.
EMA is the safer option, and most professionals will use it.
So, even if you are trying to save on the budget, don’t compromise on this part.
Some beginners also get confused about acrylic and gel nails when deciding which one is easier to start with.
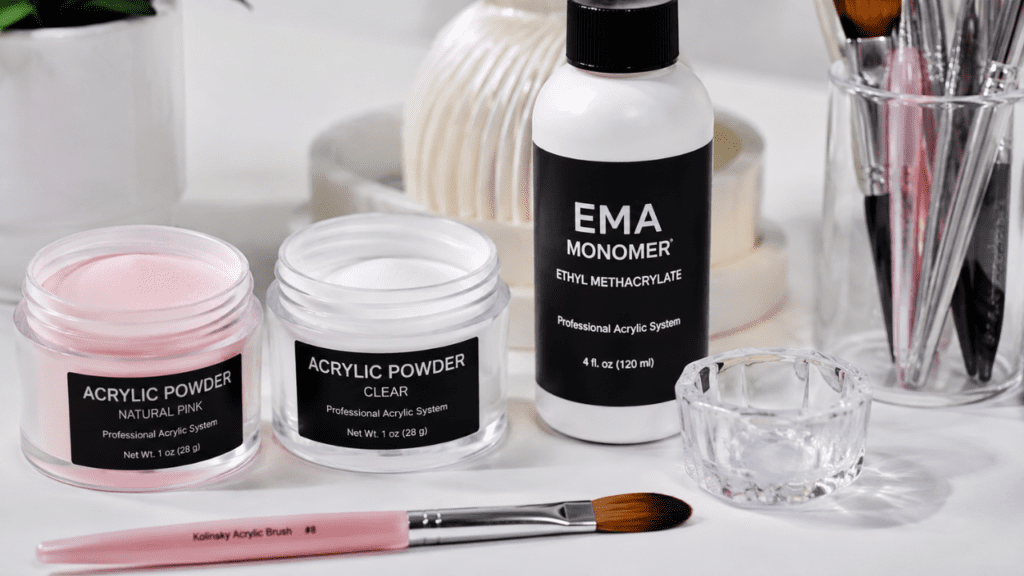
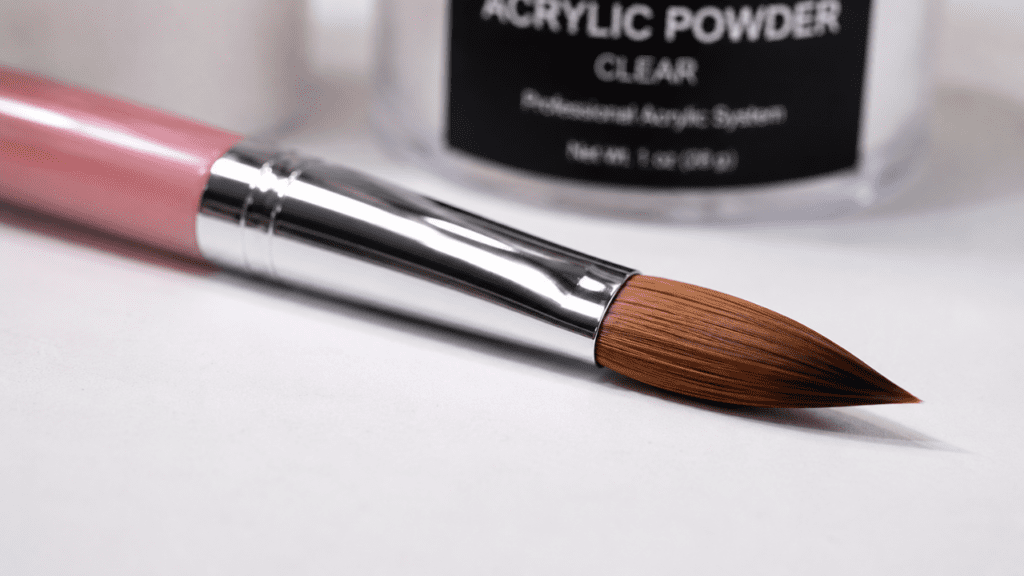
2. Acrylic Brush – Very Important
I am not exaggerating… the brush quality surprisingly creates a huge difference.
If you use a bad brush, you will feel very frustrated.
By using a bad brush, beginners may struggle with:
- Messy cuticles
- Bulky nails
- Uneven application
- Difficult bead control
You don’t need the world’s most expensive brush immediately. But at the same time, avoid selecting a super-cheap, random brush, too.
Size #8 is usually the easiest for beginners, as it is neither too big nor too small.
And one small thing I learned the hard way: clean the brush immediately after use. When the acrylic dries, the brush will stiffen and not work smoothly.
When I started, I didn’t know about brush care; now I understand why nail techs are so careful with the nails. We should learn from our mistakes, right? lol.
3. Nail Files & Buffer
In this section, beginners will mostly get confused.
Because online, you can see
- 80 grit
- 100 grit
- 180 grit
- 240 grit
- Diamond file
- Curved file
and it may feel overcomplicated, but an actual beginner needs:
- 100/180 file
- buffer block
That’s it.
The file is used to shape the acrylic. The buffer helps to smooth.
While I was practising acrylic, I used to file very, very hard and thought “If I file harder, the shape will be better”.
Actually, the opposite happened: my nails became uneven and rough, and it took me some time to realise that Gentle filing gives cleaner results.
If your nails peel or break easily after filing, it may be because your natural nails are damaged, so gentle filing is very important.

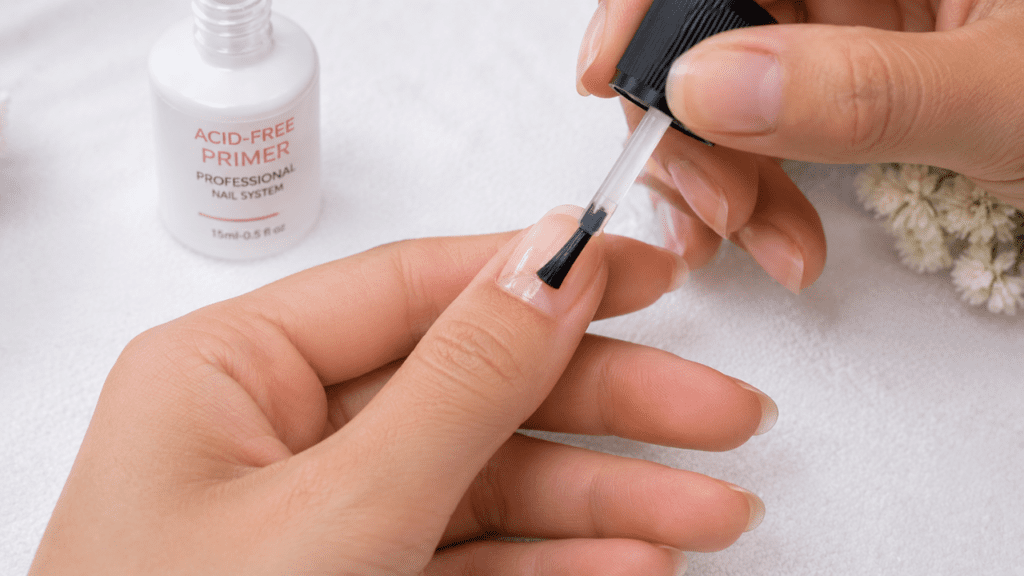
4. Primer & Nail Dehydrator
These two products will help reduce lifting of acrylic nails.
The dehydrator will remove the oil from the nail surface.
Primer helps the acrylic stick properly to the nails.
This step may feel boring at first, since powders and brushes always feel more exciting.
But surprisingly, when you do proper prep, it creates a huge difference, and it is the actual foundation.
Most beginners will get lifting problems because of,
- Skipping this prep step
- Rushing
Always prefer an acid-free primer; that will be gentler and safer.
And with proper prep, the acrylic nails will be cleaner and last longer. Many beginners complain that acrylic nails lift quickly; the main reason is skipping the prep.
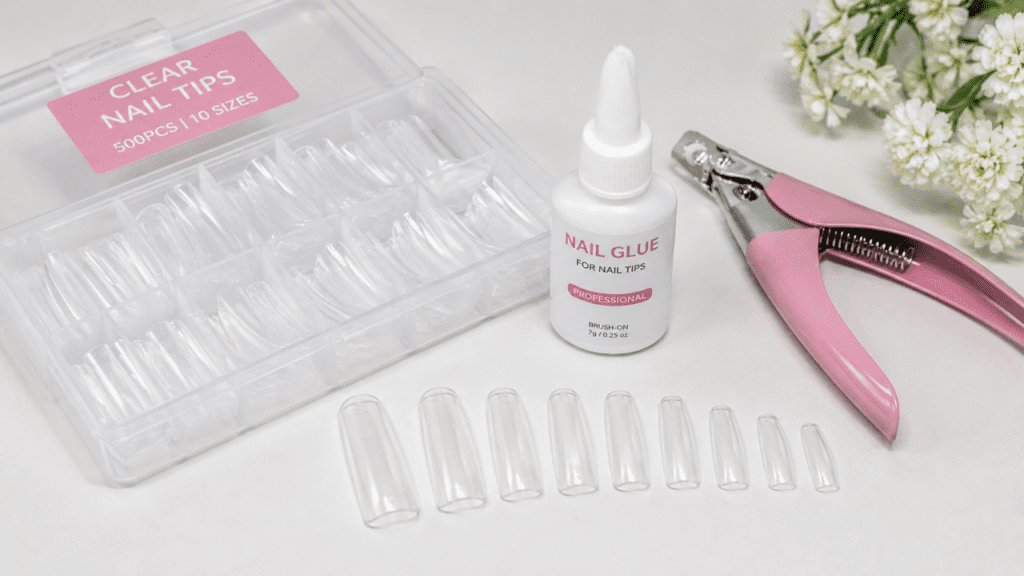
5. Nail Tips & Glue
When I saw the sculpted nail form videos, I thought, if I’m going to do acrylic nails, I need to learn and master this first.
But honestly, nail tips are very easy for beginners.
The nail tips have already given shape and length, so you need to focus on
- Bead control
- Smooth application
- Shaping
Instead of struggling with everything at once, I personally felt short acrylic nails are the easiest option for beginners.
I know long nails will look wow online, but shorter acrylic nail shapes are easier for beginners because they’re simpler to file and control while practising.
And it helps build confidence little by little.
Shaping acrylic nails will be confusing for beginners at first. You can try oval, square, almond shapes later. First, a simple and short shape is enough.
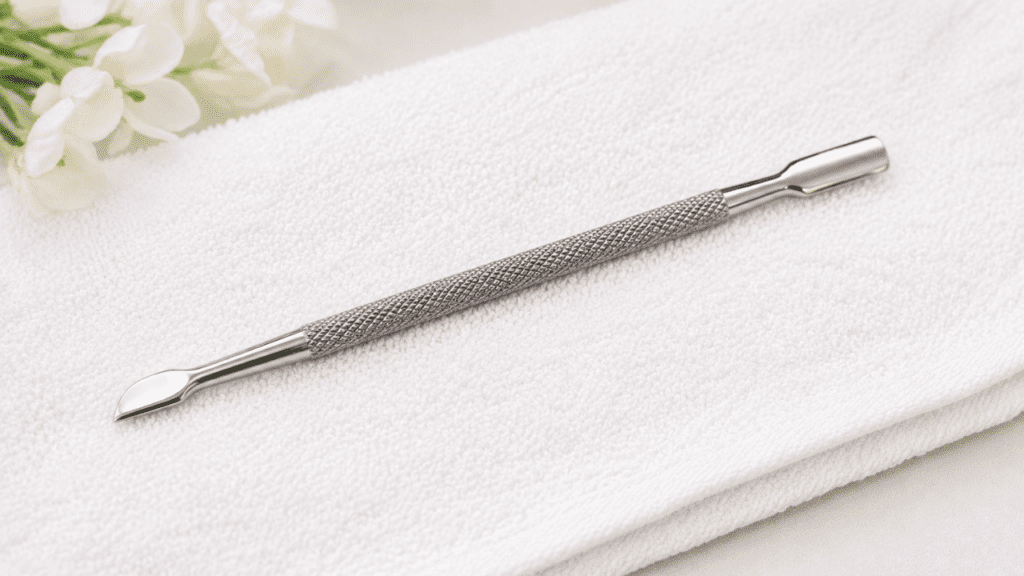
6. Cuticle Pusher
Just a simple tool but very useful for clean application.
When you push the cuticle, the acrylic will set neatly. For Beginners, don’t buy expensive salon cuticle tools; a basic stainless steel cuticle pusher is enough.
Just use it gently and push back.
Most beginners will push aggressively first as they get nervous, but that’s normal.
Take your time.
If your cuticle area is clean, the acrylic application gives the overall look a neat finish. So, don’t skip the nail prep and do it slowly.
Essential Acrylic Nail Tools for Beginners
| Tool | Why You Need It | Beginner Tip |
|---|---|---|
| Acrylic Powder | Creates the actual acrylic nail structure | Start with clear or natural pink powder first instead of buying too many colors initially |
| EMA Monomer | Mixes with powder to create the acrylic bead | Avoid cheap MMA products because they can feel much harsher on nails |
| Acrylic Brush (#8) | Helps apply acrylic smoothly and control bead placement | Clean the brush immediately after every use |
| 100/180 Nail File | Shapes acrylic nails and smooths uneven edges | Gentle filing honestly gives cleaner results |
| Buffer Block | Smooths the nail surface before finishing | Don’t over-buff your natural nails |
| Nail Dehydrator | Removes oils before acrylic application | Helps reduce lifting problems a lot |
| Acid-Free Primer | Helps acrylic stick properly to the nail | Apply only a thin layer near the nail surface |
| Nail Tips | Adds beginner-friendly length and shape | Shorter tips are honestly easier to practice on |
| Nail Glue | Secures nail tips properly before acrylic application | Use small amount only to avoid messy application |
| Cuticle Pusher | Helps clean the nail prep area | Be gentle around the cuticle area |
Some links in this article may be affiliate links. If you buy through them, we might earn a small commission at no extra cost to you.
It honestly helps us keep creating simple, beginner-friendly nail content like this.
Tools You Really Don’t Need Immediately
Honestly…
Looking back now, I wish someone had told me this earlier.
When you start, don’t buy,
- Expensive e-file
- Giant nail desk
- Luxury machines
- Advanced forms
- 20 acrylic powders
- Multiple brushes
Social media will make beginners feel “need a full salon setup”. But actually, the basics alone will help you achieve perfect acrylic nails.
And learning a simple setup will be less overwhelming.
Over time, if you love doing acrylic nails, you can slowly add extra tools. In the Beginning, it’s important to learn the basics comfortably.
Mistakes That Most Beginners Do
Using Too Much Acrylic
Almost every beginner, when they start out, applies a thick coat of acrylic.
Thinner, controlled layers will give a prettier look. So building slowly is better.
Bulky acrylic nails are a common problem for beginners. Your smoothness will improve over time as you practice.
Filing Too Hard
As I already said, aggressive filing can weaken natural nails and lead to uneven results.
Gentle shaping always gives better results.
If your Natural nails are weak, you should remove and file acrylics carefully.
Rushing
This is one of the biggest mistakes, honestly.
As we all know from online videos, the acrylic nails will look classy.
But in Real life?
The results will be a little messy first.
Some days the bead will sit perfectly, and some days it will be a complete mess.
Actually, that’s very normal. Don’t pressure yourself too much.
If you practice on any fake hands or nail tips, your confidence will slowly improve.
Proper acrylic removal honestly matters just as much as application if you want healthier natural nails long term.
FAQs About Acrylic Nail Tools for Beginners
Do I need expensive tools to start acrylic nails?
No. Social media sometimes makes acrylic nails look super expensive to start, but for beginners, a basic setup is enough.
You really only need Acrylic powder, EMA monomer, a brush, Files, Primer, and tips.
That’s enough to practice comfortably at home. You can add extra time as you learn about acrylic nails.
Why does my acrylic keep lifting?
Most beginners will face this problem when they start. Usually, lifting happens because of skipping nail prep, not properly removing oils, rushing primer, or acrylic touching the cuticle.
Proper prep will create a huge difference. Once the prep improves, the lifting will reduce.
What’s the difference between EMA and MMA monomer?
EMA is the safer option and is recommended by most professionals.
MMA usually has a strong smell, harshness on the nails, and removal will be difficult.
In Cheap acrylic kits, MMA is sometimes used because it is cheap and readily available. So for beginners, EMA is a safer choice.
Why does my acrylic brush become hard?
When the acrylic inside the brush dries, the brush will harden. Not everyone places importance on brushing care; after every use, clean it.
Immediately clean the brush, remove any acrylic residue, and store it properly.
Good brush care will extend the brush’s life.
Can I practice acrylic nails without using my real nails?
Yes, actually, beginners can practice on tips or fake hands.
Trying on real nails will be stressful.
If you use practice tips: The bead control will improve, you can practise shaping, and you can free-do mistakes.
And that helps to build confidence.
Final Thoughts
The acrylic nails won’t be overwhelming when you stop focusing on every single tool.
Most beginners only need:
- Powder
- Monomer
- Brush
- Files
- Prep products
- Tips
Your first sets probably won’t be salon-perfect, and mine definitely not, haha.
But if you practice slowly, the bead control will improve, Shaping will be easier, and you can slowly build confidence.
Just start simple; that is the mantra for beginners, I say for all.
And if you love beginner-friendly nail guides like this, more acrylic nail tips, nail care advice, and simple nail inspiration are waiting for you on The Natural Nail.
