

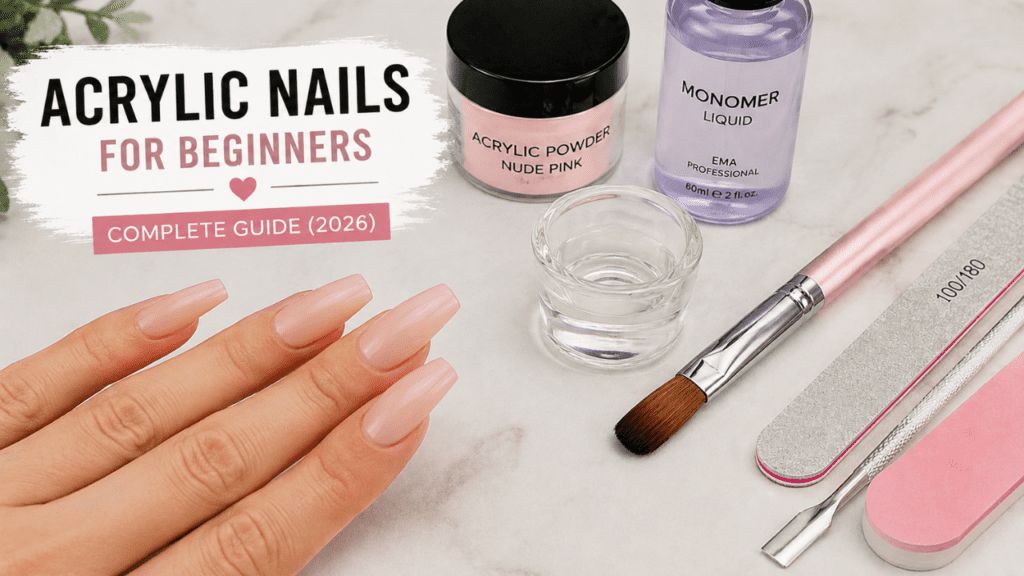
Are you going to try acrylic nails for the first time? Honestly, you will feel a little overwhelmed at first.
And you will be confused about how to use monomer, acrylic powder, brushes, nail tips and other acrylic products; it’s completely normal.
Especially, you will think it’s very easy to do acrylic, because many professional nail techs on social media create smooth, flawless acrylic sets, adhu romba easy madhiri theriyum. But in reality, learning acrylic nails requires patience and practice.
This guide to acrylic nails will help beginners understand application, maintenance, removal, and essential acrylic nail care tips.
But the good news is, we can definitely learn acrylic nails.
Once you understand the basics:
- Bead consistency
- Proper nail prep
- Filing
- Shaping
Everything will gradually become easier.
I am sure your first few sets may not be perfect, like salon-level. But almost every beginner starts like this.
In this beginner-friendly guide, we will cover:
- What are acrylic nails?
- Beginner tools
- Step-by-step application
- Common mistakes
- Aftercare
- Safe removal tips
So if you’ve been thinking about trying DIY acrylic nails at home, this guide will make your journey easier.
What Are Acrylic Nails?
For creating acrylic nails, two ingredients will be used.
- Liquid monomer
- Acrylic powder (polymer)
When you mix these two, a soft acrylic bead slowly forms and hardens, creating a strong protective layer on the nails.
Like Gel nails, UV lamps are not required, as acrylic nails will dry naturally.
Acrylic nails are very popular because they will be
- Strong
- Long-lasting
- Customizable
- Super for Nail art
- Gives extra nail length
And… when you give the final touch with proper shaping and a glossy top coat, your hands instantly look more polished and neat.
Pros and Cons of Acrylic Nails
Before starting acrylic nails, you should understand the pros and cons.
Because yes, acrylic nails will be beautiful, but maintenance and practice are also important.
| Pros | Cons |
|---|---|
| Strong and durable | Strong smell during application |
| Usually lasts around 2–3 weeks | Beginners may need some practice |
| Perfect for nail art and long nail styles | Incorrect removal can damage natural nails |
| Easy to customize length and shape | Regular fill-ins are needed |
| Allows you to try different trendy nail shapes | First few beginner sets may look slightly bulky |
For those who prefer strength and durability, acrylic nails are usually a good option.
However, if you want a softer and more flexible finish, you should check the detailed comparison.
Acrylic vs Gel Nails
Understanding Acrylic Powder and Monomer
These names will be very confusing at first, but once you understand the basics, the acrylic process will feel very easy.
Monomer (Liquid)
Monomer is an acrylic liquid.
Its job is to:
- Create an acrylic bead.
- Activate the powder
- Help to harden the nail.
Most professionals use EMA monomer because it is safer and more flexible.
Acrylic Powder (Polymer)
This powder will mix with the monomer to form an acrylic structure.
Different powders available for:
- Clear nails
- Nude nails
- Pink acrylics
- French tips
- Glitter designs
Why Bead Consistency Matters So Much
Honestly, most beginners will struggle in this area.
If the acrylic bead is too wet, the cuticle will flood, and if it is too dry, it will be crumbly and rough.
A perfect bead will be smooth, slightly glossy and easy to control
Trust me, once bead consistency is set, the acrylic application process will become very smooth.
Essential Acrylic Nail Tools for Beginners
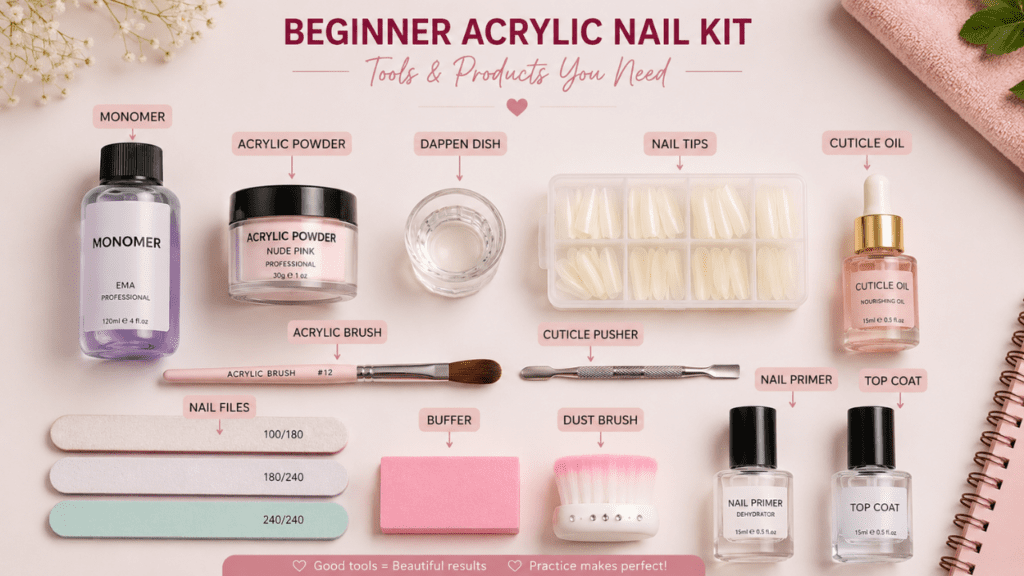
At the start, don’t buy expensive products.
Use decent beginner-friendly tools; the process will be comparatively easier.
Basic Acrylic Nail Starter Kit
| Tool | Purpose |
|---|---|
| Monomer Liquid | Activates the acrylic powder and helps create the acrylic bead |
| Acrylic Powder | Creates the main nail structure and strength |
| Acrylic Brush | Used to apply, shape, and smooth the acrylic |
| Dappen Dish | Holds monomer liquid during application |
| Nail Dehydrator | Removes oil and moisture from the nail plate |
| Acid-Free Primer | Improves adhesion and helps prevent lifting |
| Nail Files | Used for shaping acrylic nails and refining edges |
| Nail Buffer | Smooths the nail surface for a cleaner finish |
| Nail Tips/Forms | Add extra length and help create nail extensions |
| Cuticle Pusher | Prepares the nail area before acrylic application |
| Dust Brush | Removes filing dust from nails and workspace |
| Top Coat | Adds shine and protects the acrylic nails |
| Cuticle Oil | Hydrates cuticles and helps keep nails healthy |
Actually, good acrylic brushes create a huge difference. Cheap brushes will lose their shape fast, especially since it’s difficult for beginners to have good control.
If you need more details about beginner tools:
- Acrylic Nail Tools Guide
- Best Acrylic Nail Brushes for Beginners
- Best Acrylic Powder and Monomer for Beginners
Nail Prep: Most Beginners Skip This
Surprisingly, nail prep is more important than acrylic itself.
Many beginners will start directly with the application. Then, after a few days, the lifting will start, but: confused like “Why did my acrylic nails get lifted?”
In most cases, the reason is poor prep.
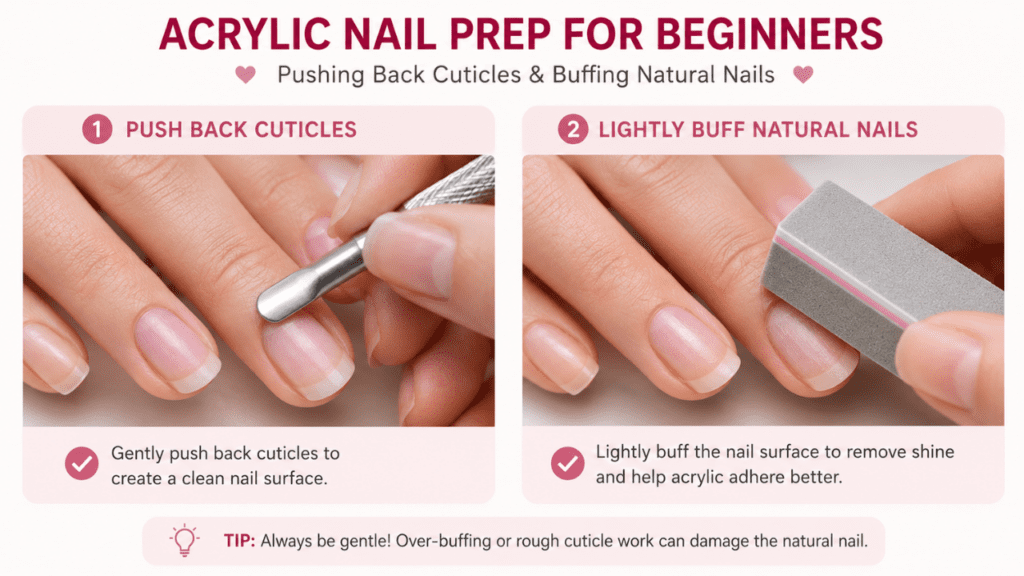
Step-by-Step Nail Prep
1. Wash and Sanitise Hands
Clean hands and tools are very important.
2. Push Back Cuticles
Gently push back the cuticles using a cuticle pusher. Make sure it doesn’t come into contact with the skin.
3. Shape Natural Nails
The Natural nails should be short and even.
4. Lightly Buff the Nail Surface
Use a Fine-grit buffer and remove the shine.
Over-filing can weaken the natural nails.
5. Remove Dust Properly
The remaining dust will affect the adhesion.
6. Apply Nail Dehydrator
This will remove the oil and moisture from the nails.
7. Apply Acid-Free Primer
This Primer will help acrylic stick better.
Honestly, if you skip the dehydrator and primer, you will notice a big difference, so don’t miss them.
Nail Tips vs Nail Forms
Beginners usually confuse nail tips and nail forms.
Nail Tips
The Plastic extensions will be glued on the natural nail.
For Beginners, it will be:
- Easier
- Faster
- Beginner-friendly
Nail Forms
Forms will be placed below the natural nail and used as a guide.
Using forms gives:
- Custom shapes
- Cleaner sculpted nails
- Advanced designs
Most beginners use nail tips first because forms require some patience to use.
Step-by-Step Acrylic Nail Application
Okay… This is the most exciting part.
At first, applying acrylic may feel very messy. But don’t worry, that is super normal.
Even experienced nail techs don’t do perfect sets.
Step 1: Set Up Your Workspace
The workplace should be:
- Clean
- Bright lighting
- Proper ventilation
The smell of acrylic may feel very strong at first, especially for beginners.
Step 2: Pour Monomer Into Dappen Dish
Just pour a small amount so the waste will be less, and the smell will be manageable.
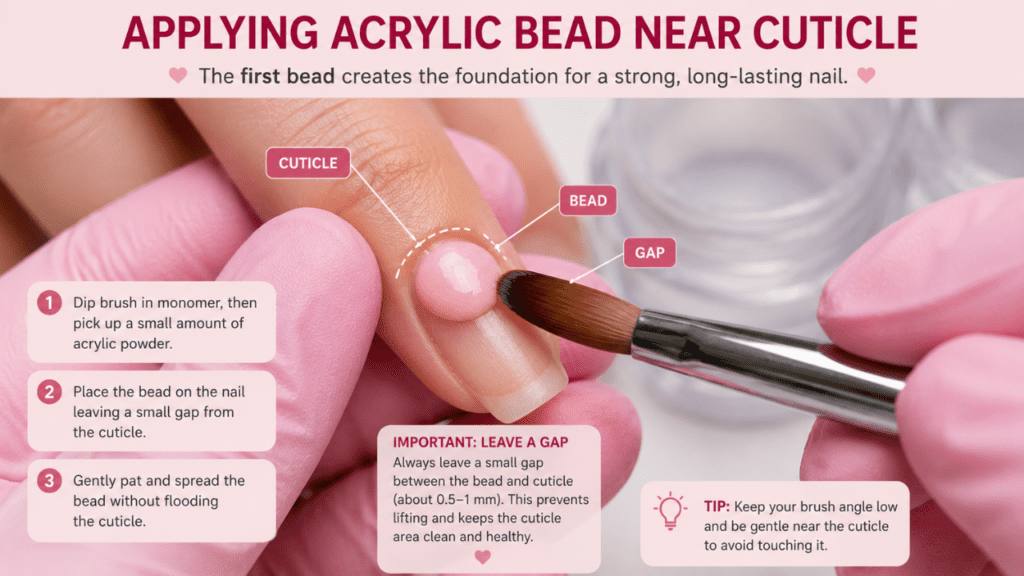
Step 3: Pick Up Your Acrylic Bead
Dip the brush into the monomer.
Then gently touch the acrylic powder so the bead forms naturally.
If the bead spreads, it’s too wet or chalky; if it doesn’t, it’s too dry.
At first, it’s normal to get weird beads.
Step 4: Apply First Bead Near Cuticle
Place the Small bread near the cuticle area.
Leave a tiny gap, without touching the skin.
And honestly, a clean cuticle area will create a huge difference.
Step 5: Build the Apex
The apex is the nail’s highest point; it’s very important for strength.
If there is no proper apex, the long nails are likely to crack.
Step 6: Apply Acrylic to the Free Edge
Use another bead to build the length and tip.
Try to make the acrylic:
- Smooth
- Even ah
- Don’t overly thick
Beginners commonly make this mistake and end up with bulky nails.
Step 7: Allow Acrylic to Fully Harden
Allow it to fully cure:
- Fell hard
- Can hear a tapping sound
Then you can start with filing.
Filing and Shaping Acrylic Nails

And wow… the proper filing will completely change the acrylic nails’ look.
Even if you apply unevenly, the good shaping will make the final look more professional.
Basic Filing Steps
Shape the Sidewalls
Shape it straight and even.
Shape the Free Edge
Popular beginner shapes:
- Square
- Oval
- Almond
Smooth the Surface
Smooth the bumps and uneven areas.
Refine the Cuticle Area
The cuticle area should not be bulky.
Buff the Nails
Buffing gives a smoother salon-style finish.
If you want more shaping help, we are here to help you with How to Shape Acrylic Nails Properly.
Applying Top Coat
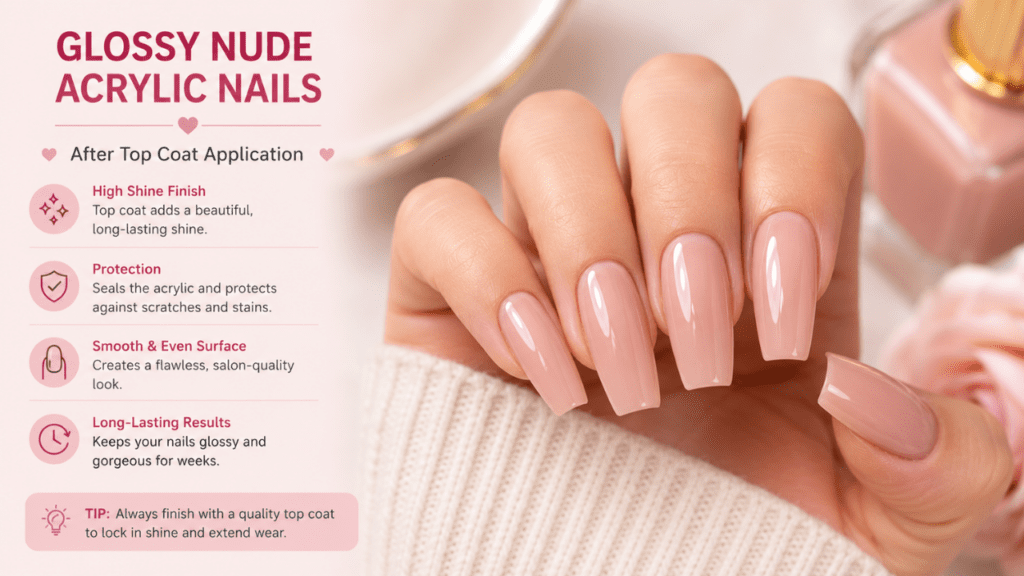
Honestly…this is the most satisfying part.
While applying the top coat, the whole nail set will instantly look cleaner, shinier, and more finished.
After filing:
- Remove the dust
- Apply the top coat
- Dry fully
Then apply cuticle oil.
Aww… when you get the glossy, smooth finish, you’ll feel very satisfied, right?
Common Beginner Acrylic Nail Mistakes
If your first acrylic set is uneven, seriously, don’t worry.
Almost every beginner makes these mistakes.
1. Flooding the Cuticles
Usually, this happens when the bead is too wet.
This will cause.
- Lifting
- Messy look
- Irritation
2. Thick Bulky Nails
Beginners often use too much product.
Try to make thin, controlled layers; they usually give much better results.
3. Poor Nail Prep
If you skip the Prep, the acrylic will lift fast.
I’m not exaggerating; just the proper prep alone improves the retention more.
4. Incorrect Bead Ratio
It will be difficult to apply when the bead is too wet or too dry; you can improve it easily with practice.
5. Over-Filing Natural Nails
Aggressive filing will weaken the natural nails, so work gently.
How Long Do Acrylic Nails Last?
Usually, acrylic nails easily last for 2–3 weeks.
However, longevity depends on:
- Prep
- Aftercare
- Daily habits
- Application quality
Surprisingly, gloves will help a lot with household chores.
To protect your nails, read “How to Protect Nails While Washing Dishes.”
Do Acrylic Nails Damage Natural Nails?
Acrylic nails themselves are not always the problem.
Most damage usually happens because:
- Improper removal
- Aggressive filing
- Acrylic peel pannradhu
- Poor application
Safe removal is very, very important.
To learn about the gentler alternatives: Non-Toxic Acrylic Nails Guide.
If you have weak nails, this guide will help you fix it: Why Are My Nails Breaking Easily?
How to Remove Acrylic Nails Safely at Home
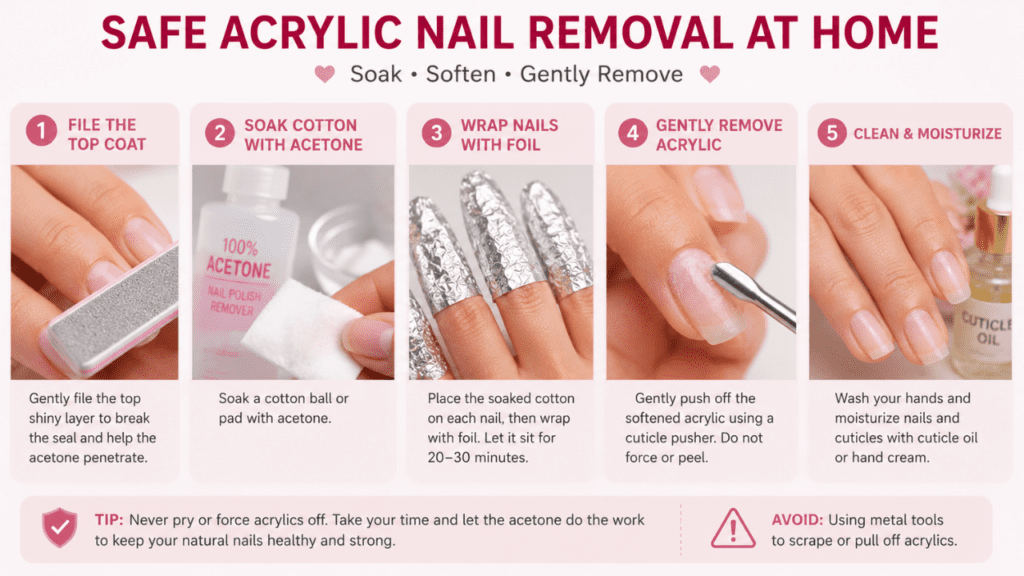
Please, please don’t try to force the acrylic nails off; this will only further damage the natural nails.
Safe Acrylic Removal Steps
1. Trim Extra Length
First, make the nails short.
2. File Off the Top Coat
This will help the acetone work faster.
3. Soak in 100% Acetone
Use:
- Cotton balls
- Foil wraps
And soak for 15–20 minutes.
4. Gently Remove Softened Acrylic
If the acrylic is hard, don’t try to force it; resoak it patiently.
5. Hydrate Nails Afterwards
After removal, use
- Cuticle oil
- Hand cream
- Nail strengthener
We have written a detailed guide to removing acrylic nails; it will help you do so without stress.
Is It Safe to Do Acrylic Nails at Home?
Yes, beginners can safely learn about acrylic nails at home.
But following safety is very important.
Always:
- Use ventilatio
- Avoid skin contact
- Use a mask during filing time.
- Keep the tools clean.
And honestly… patience is equally important.
The First few sets may not be perfect, but you will definitely see progress.
One day, you will admire your own nails with your own art and feel
“Wait… actually this looks very pretty😍”
And that feeling honestly will be super satisfying.
Frequently Asked Questions
Are acrylic nails beginner-friendly?
Yes. Beginning may feel a little difficult, but with regular practice, beginners can definitely learn.
How long does it take to learn acrylic nails?
For basic application, you need a few weeks of practice. Learning advanced shaping and nail art may take some more time.
Are acrylic nails painful?
When applied correctly, acrylic nails should not be painful.
Pain usually occurs due to over-filing, pressure, and Improper application.
Can I do acrylic nails at home?
Absolutely, many people have learned acrylic nails completely at home.
What’s better for beginners: acrylic or gel?
Many beginners prefer acrylic for its strength and ease of shaping. Others prefer gel for a softer, more flexible feel.
Final Thoughts
Learning acrylic nails takes patience, practice, and consistency; in the beginning, the bead pickup, shaping, filing, and smooth application may feel frustrating.
But over time, the control will improve naturally, as I already said.
And trust me… your acrylic sets will gradually get better and will be so satisfying!
Start simple.
- Don’t skip the Prep.
- Practice with thin layers.
- Don’t try to rush.
Because even professional nail techs were once beginners.
